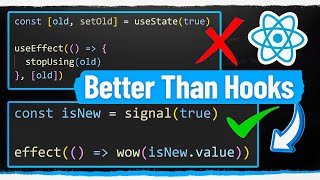
The Problem with React Hooks
I have a love-hate relationship with hooks in React. If you've been using them for any amount of time, you probably do, too. I mean, I love how powerful they are and how easy it makes it to do certain things with reactivity in your website, but I hate how complex they can be and how easy it is to ruin your application with hooks.
There's so many rules you need to know, and there's a lot of special techniques that are very specific to hooks that you need to understand in order to make sure your application is as performant as possible. If you don't follow these rules, which is quite difficult to do, you can really kill the performance of your application, and it's just super hard to work with.
This is why I really like the idea of signals, because what they do is all the same powerful stuff as hooks, but they make it incredibly easy to use. There are no complicated rules to worry about, and performance is out of the box by default, so you don't even have to worry about it.
A Simple To-Do App with useState
Welcome back to WebDevSimplified. My name is Kyle, and my job is to simplify the web for you so you can start building your dream project sooner. And to get started, I have a really simple to-do list application built out to kind of show you why signals are so useful and some of the problems that they solve. So, this is a simple application. You can see I have a navbar, a to-do list, and a sidebar. And in all of my components, I actually have a console log just saying that we've rendered that component, so we can see what the re-rendering looks like in our application.
Our navbar, super straightforward, it's just this top section you see here. Our sidebar, also super straightforward, it's this right-hand sidebar you see right here. Common stuff you would see in a normal application. And then our to-do list is a bit more complicated. You can see that we have this to-dos value stored in state, and it's also persisted inside of local storage. And we have a function for adding a to-do, a function for toggling, so when I toggle this, for example, and refresh, you can see all of my data persist. All this is happening with this use effect here. And then I just have all the different JSX for this form, as well as the to-dos being rendered out down here. And if I add something in, you can see it shows up and persist when I refresh my page.
Now, this is about the most basic form of application you can get, and in this particular scenario, using state or signals, it really doesn't matter. They're both pretty easy to use and it's doesn't really make a difference which one you use because it's so simple the application that we're building. You can see if we inspect our page here, I'll bring this over and we look at the console, you'll notice if I just clear this out, whenever I like toggle one of my to-do's or something like that, you can see that the only thing re-rendering is my to-do list. Nothing else in my application is being changed.
But now, what happens if my application gets a little bit more complex? And now I want to show the completed to-do count inside of this header as well. Well, I need to get all of this to-do state. I need to remove all of this from my to-do list and I need to move it over into my app instead. So, it would need to be inside of here like this. Now, the reason that I need to do it this way is because I need access to this to-do state inside of my app because my app is a parent of this navbar. So, obviously if I want to pass my state to the navbar, I need to have access to it inside of the parent component.
Now, I just copied over the code to actually make this work and as you can see inside of the app, we now have all of the code related to our to-dos and we're passing our to-dos into our navbar. And then we're passing all the information for adding and toggling to-dos and so on into our to-do list. So, we look at our to-do list, you can see it's very simple. There's almost nothing in here because it's just dealing with this one form input. And you can see in our navbar, it's actually getting the completed to-dos and you can see up here, the completed number is one. And when I toggle, you can see that this is properly updating.
Now, if we look at how the actual re-rendering of our application works, if I clear this, you notice when I toggled this, it's actually re-rendered my app, my navbar, my to-do list and my sidebar. And that's because I'm storing this state in my application, so in my app right here, which means I need to re-render my app anytime that state changes. And when you re-render a parent component, you must also re-render all of the children inside of that. So, my navbar re-renders, my to-do list re-renders and my sidebar re-renders, even though in reality, when I toggle this laundry checkbox, my actual app doesn't change. Like the actual, you know, HTML being generated for the app portion doesn't change. My sidebar obviously doesn't change, but those things are being re-rendered unnecessarily.
Now, this honestly isn't a massive deal, especially on a small scale application like this. But, as your application grows and grows and grows, and your state becomes shared across all of your different application, it's very common that a lot of your state ends up inside of your app component or some other really high-level component, or maybe you move it into context, but you still get the same problem where your app is just wrapped by like seven different contexts. You have all these extra re-renders you really don't need. So, that's the first thing that signals are trying to solve. And in my opinion, it's one of the smaller things they're solving. They solve this performance by making it performant by default, and you don't have to worry about doing a bunch of things like memoizing or react.memo and all that stuff that you would need to do to actually make this as performant as you can.
How Signals Solve the Problem
The real place where signals shine is that they get rid of all of the rules related to hooks. For example, with hooks, you need to know that you can only use your hooks at the top of your component. You can't use them inside of like an if statement. You can't use them other places. They must be used only in components and custom hooks. There's a ton of rules around like how you use a use effect, making sure you have all your dependencies in here. All of that is a thing of the past with signals because they handle all your dependencies for you. You can use them wherever you want, in a component, outside a component, in a function, it doesn't matter. It's so amazing how powerful they are.
And this entire signals library that I'm going to be using for this video is going to be the Preact Signals library. And you don't have to be using Preact for this. They have libraries for Svelte, Preact, React, normal JavaScript, it doesn't matter. And they have this amazing blog article that I'll link in the description for you that goes over their entire thought process behind why they implemented signals and why they did it the way they did. This is an amazing article look at. They even have some sort of performance metrics here, and you can see that they've actually increased the speed time of the page from 2.6 seconds to 0.6 seconds just by implementing signals, which is absolutely crazy.
So, in order to show you how signals work, I've taken our code and I've reverted it to exactly what we had before where everything is still inside of our to-do list. If we go back to our code, you can see we no longer have that completed section here. I'm going to show you what it would look like implementing this using an actual signal instead of using a hook inside of React. So, to use this signal library, we first need to install it. So, we'll npm i @preact/signals-react. So, we'll run that to install the library and now we can start using signals. And signals allow us to replace all of our use states as well as our use effects. And in doing so, we can replace almost always our use memos and use callbacks because that all of that is kind of taken care of for us. Memos and callbacks are just really there as a way to add performance to your application and signals just do that by default.
Creating Your First Signal
So in order to understand how a signal works, let's take a look at creating a signal right now. So we can just call this signal function. So we're going to get that from signals-react. So we're just going to say signal just like that. We're going to make sure that it imports from the React library. There we go. And all this signal does is take a value. So for example, I could just give it the string of Kyle and I could say that this signal is going to be a name signal. So we'll say const name equals signal Kyle.
So now I have this name variable and if we just console log what this name variable looks like, we'll go over to our application. We'll give it a refresh. Make sure I rerun the application first.
And we'll just look at our console to see what this looks like. And you can see, if we scroll to the very top, I get this thing all the way up here and you can see it has kind of a lot of complicated information going on behind the scenes but the most important thing is it has this value property right here which always returns to me whatever the current value of this thing is. That's the only thing I really care about for this signal. All this other complicated stuff is just to make sure everything works behind the scenes cuz it does a lot of really cool stuff.
So if I want to access this value, I could just say name.value and now if I refresh and I look over here, you'll see that it should print out Kyle at the top of my screen just like that. There we go. Now the real power of this comes in the ability to actually make sure everything that uses this signal automatically updates anytime my signal changes. So for example, if I just say name.value is now equal to Sally, all of the code that uses this signal is going to get updated with this new signal value which is incredibly amazing.
So I'm just going to put this inside of a set interval for now. So I'll say set interval and we'll say that every half a second I'm going to update the name to something else. So we're just going to say math.random. Oops, math.random. There we go. We're just going to convert this name to a random number. And I'm just going to put that inside of my JSX. So here, we're just going to put that number. So we'll say name.value. So as you can see, I'm not using state. I'm not using anything at all. All I'm doing is I just have a name value here, and I'm just changing the name every 500 milliseconds. And now if I save, you can see every 500 milliseconds my application is updating with that new value inside of it. And I'm not doing anything related to state or anything complicated at all. And if I look at my code to see what's re-rendering, if I just close out of this, you can see the only thing re-rendering is my to-do list cuz that's the only component that's using these updated things.
So really, if you look at a signal, all it is is a way for you to store a value, and then whenever that value is changed, to update everything that relies upon that signal's value, which is really, really powerful.
Replacing useState and useEffect
And that already solves a lot of the use state stuff we need. So if I wanted to convert what I'm doing with use state down here to a signal, I could create a to-dos signal. We'll say that's equal to a signal, and I'll also just create a function that essentially encapsulate all of this code inside of here for getting my value from state. So we'll just say like get to-dos is going to return these values right here. And then we'll just call that inside of our signal to get our default value. There we go.
So as soon as my application runs, it calls this get to-dos function, and it just gets it from local storage. Now we have our to-dos. So we can remove all this code right here for setting our to-dos. We don't need to worry about any of that. And here where we're setting our to-dos, we can just directly set the value variable for our to-dos. So we can say here our to-dos.value is going to be equal to taking our current to-dos.value, you know, going over that, and then adding a new to-do into that. Super straightforward. Same thing here. I can just say to-dos.value is equal to, and all I want to do is just take my current to-dos.value, map over it, and get the new information. So I don't have to worry about any of that setting stuff, worrying about what happens when I have an old version of a to-do, a new version of a to-do, you know, how I actually do my setting, is it the function version or not. I don't have to worry about any of that.
You can see if I give that a quick save and I actually use that to do. So I remove this name section here and I'm using my to-dos.value down here. You can now see I have my information in my list and it looks like everything is pretty much working as it is before. You notice right now nothing's being stored in local storage cuz my use effect is not working because right now it's never updating since my to-dos never actually changes, but we can get around and we can fix that.
This is because also this signals library has use effects essentially built into it by the effect function. So this effect function, all you need to do is anything that you want to update based on a signal value, you put inside of here. So in our case, we're updating our local storage every single time our to-dos change. So every time our to-dos.value changes, I want to update the information in local storage.
And the really crazy thing about this, I don't need to pass a second dependency array into here. Since I'm using my to-dos.value in this function, the signals library is smart enough to look at that and say, "Okay, I am using to-dos inside of this effect. So every single time my to-dos changes, I'm going to rerun this effect." So let's get rid of this code that we had down here. Now you'll notice we're not using use state or use effect anywhere. You can see I can essentially completely remove this. Technically we are using use state right here, but we could change that if we wanted to. It really doesn't matter. But you can see we have no use effects or anything. But now when I add something to my list, you can see I have these four items. Refresh, it's all persisted. I uncheck these, everything is persisted. So now I have everything being persisted.
I have no rules to worry about. I mean, all of this code's not even in a React component. I could put this code anywhere at all. It doesn't matter. And it's amazing that it's just all working out of the box without having to do any extra work.
And the best part is this is incredibly performant because of the next thing I'm going to show you. So we want to put the completed to-dos in the navigation bar. Well, I can just export this signal right here for to-dos. I can use that other places. So let's go into my navbar. I'm going to come in here and I'm going to import that to-do information. So I'm going to import to-dos from that to-do list. And now what I can can is I can actually get whatever the value is going to be from my to-dos. So, in my case, I would need to filter it and so on. So, let's create a div and this is going to say completed and then inside of here, we're going to take our to-dos. We're going to filter our to-dos and we only want to get the to-dos where that completed property is true.
There we go. And I specifically want to make sure I do the value for my to-dos. There we go. Give that a quick refresh. And actually, I need to make sure I get the length of this if I want to just get the number. So, we'll just come in here with the length.
So, now you can see I have two completed to-dos, which is pulling from this value. And now you can see it's down to one and zero and so on. But, the really cool thing that's happening here, if I go to my console, I just clear everything out, when I change this, for example, you notice only my navbar and my to-do list are changing because those are the only things using this signal. And if I update this state right here, you can see it's only the to-do list changing. But, down here when I change this, I'm only updating those two components that actually use this information, which is incredible.
Now, one important thing to note is if you are using signals built from other signals, you should generally use a computed signal. For example, if I wanted to use this in other places throughout my application, I could turn this into its own signal that has all the same properties, but it would be computed from those other signals, which just means it's going to automatically update when my signals it depends on changes. To show you what I'm talking about, we're going to use the computed function. We're going to get that from the signals React library.
And we're going to come in here. This works pretty much exactly the same as effect, but inside of here, I'm actually just going to return. So, in here, I'm going to return this right here. This is essentially going to give me that information. And this is my completed to-dos count. There we go. Let me make sure I spell that right. And now this gives me a brand new signal that has its own dot value property on it. So, I could say dot value and so on. I can use this inside of effects. I can use it in other computed signals. I can pass it all over my application to make sure everything auto updates properly if I wanted to use this in other places. And now I can just place that into my JSX down here.
Give it a save and I'll get the exact same response. As you can see up here, this completed is properly re-rendering when I'm changing my values here, and it's only re-rendering the two components that change, even though they're completely separate from one another. This is a really great way to pass information between multiple different components.
A Testable Approach to Using Signals
Now, another thing that's really cool about these signals is inside of this library, there's actually hooks built in. So, if I wanted to use my signals inside of my to-do list component, I can come in here and I can use the use signal hook or the use signal effect hook. These both are going to allow me to use a signal or an effect inside of my actual component, and it's going to work with React properly. But, a lot of times when you're dealing with signals, you don't actually need them inside your components. You can pull them out of your components so they can be used in many different places.
Now, a lot of you may notice, if you're looking at this code, that it's not 100% optimized for testing. And the reason for that is is because we look at my app here, my navbar doesn't have any props being passed in, but it's pulling in data from another file. This makes it very hard to actually test this. Instead, it would be much better if I passed my to-dos into my navbar so that is a lot easier for me to test my navbar. So, instead of actually pulling it in like this, I pass it into my navbar like this, so it's going to work. Now, the problem with this is I need to rewrite my code a little bit, but signals make this incredibly easy. And this is actually how the Preact signals library recommend you do things with signals is you extract out the creating of your signals into its own file or section, and then you pass those down to props just like you do inside of normal React. You still get all the same performance gains, but it's much easier to test this as well.
So, what I'm going to do is I'm going to go into my to-do list, and all this information for creating all this state, I'm actually going to pull all of this out. I'm going to move it into my app instead. I could create a separate file for this if I wanted to be extra diligent with clean code, but for our cases, this is simple enough code. We can just paste it directly into here, and I'll make sure that I import this signal library. So, let's just get the signal library being imported.
Just like that, we'll get it from that React library, and we'll do the exact same thing down here with effects as well. So, we have all that being passed in, and now in my to-do list, I can pass down my to-dos. And in my navbar, I can pass in my to-dos as well, just like that. So, I'm passing things down just like I would in normal React. It makes things for testing a lot easier.
Now, if I go into my to-do list, I can remove all this signals-related code, and I'm getting my to-dos in from my props. And now, if I save, you'll notice magically everything is working just fine. I can add a new to-do. My completed props up here is updating, and if I look at the actual components that are being re-rendered, if I just clear everything out, when I toggle, you'll notice again, only the components that depend on that state are re-rendering, athough I'm storing the state technically in this app component, and it's being passed down from the app component, it's not re-rendering everything cuz it's only re-rendering the places it's actually used in. And everything works just like normal React. I can easily test this component by passing in my own to-do signal into here without having to worry about it importing from different files.
So, all this works just like you're used to with normal React.
Conclusion
Now, I've really only scratched the surface of what you can do with signals, so you can see the power, and hopefully it's got you excited about them. And if you want to see a full crash course on signals, let me know. If I end up creating one, I'll link it right over here for you. And with that said, thank you very much for watching, and have a good day.